How to Paint Interior Trim the Right Way
- Gene Pellegrene
- May 21
- 6 min read
Fresh trim changes a room faster than most homeowners expect. When the walls are in good shape but the baseboards, casings, and doors look nicked, yellowed, or uneven, the whole space can feel tired. If you are wondering how to paint interior trim so it looks clean, sharp, and durable, the difference usually comes down to preparation, product choice, and patience between coats.
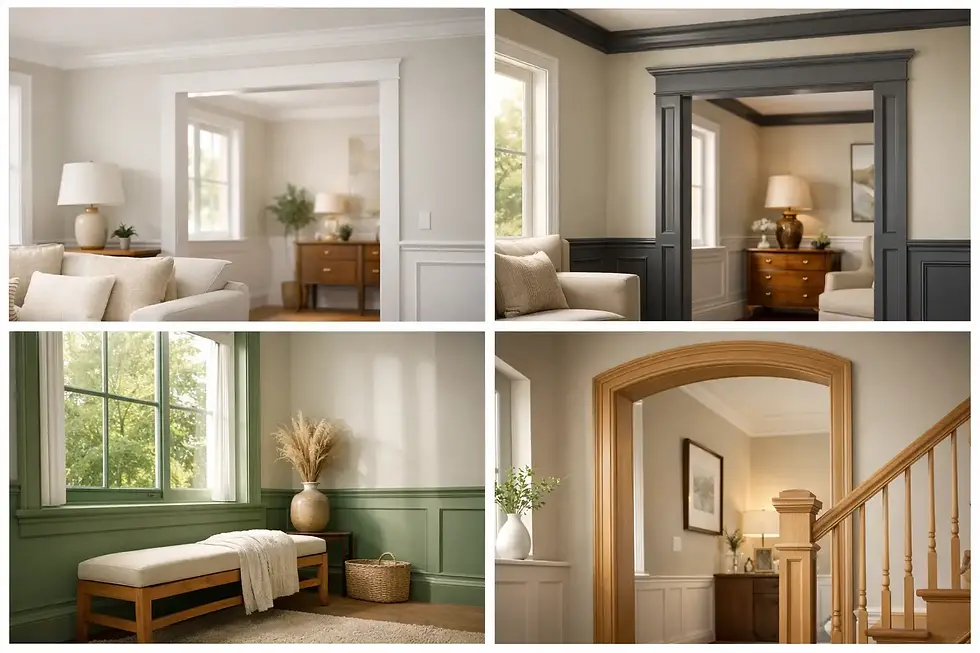
At a glance, trim seems simple. It is only a few inches wide, after all. But that narrow surface shows everything - brush drag, heavy edges, missed sanding, rough caulk lines, and the wrong sheen. A beautiful trim job has a crisp profile, a smooth hand, and a finish that stands up to daily traffic, especially in busy Chicago homes where entryways, hallways, stair rails, and door casings take a real beating.
How to paint interior trim without shortcuts
The fastest way to get a disappointing result is to treat trim like walls. Wall paint is forgiving. Trim paint is not. Because trim sits at eye level and catches light differently, even small flaws become obvious once the paint dries.
Before you open a can, decide whether the trim needs a light refresh or more complete restoration. If the existing finish is sound, smooth, and only mildly worn, you may be able to clean, sand, spot-prime, and repaint. If the trim has peeling paint, open joints, dents, old drips, or heavy buildup from years of repainting, it needs more attention. That extra prep takes time, but it is what gives trim that tailored, furniture-like look homeowners usually want.
Start with the condition of the trim
Walk the room slowly and look at the trim from more than one angle. Natural light will reveal things overhead lighting hides. Check for cracked caulk at the wall line, nail holes, chipped corners, water stains near windows, and glossy surfaces that may resist new paint.
This is also the point where material matters. Solid wood trim, MDF, finger-jointed boards, and older painted millwork do not all behave the same way. MDF is smooth and easy to finish, but it swells if moisture gets into damaged edges. Older wood trim may bleed tannins or show grain if it is not primed properly. Previously painted oil-based trim can accept a new finish beautifully, but only if the surface is deglossed and bonded correctly.
Cleaning matters more than people think
Trim collects dust, hand oils, cooking residue, and floor-cleaning splash. Paint does not bond well to grime, even if the surface looks clean from a few feet away. Wipe the trim thoroughly with a degreasing cleaner, then rinse or wipe again as needed so no residue remains.
In kitchens, mudrooms, and around light switches and doors, spend extra time on touch points. If the room has been smoked in or has old waxy buildup, simple dusting will not be enough. A clean surface gives you a better sanding pattern and a more predictable finish.
Sanding creates the finish you actually see
Good trim painting is often won before the paint goes on. Light sanding removes minor imperfections, dulls the sheen, and gives the new coat something to grip. For a standard repaint, a fine sanding sponge or 180- to 220-grit paper is usually enough. If there are old drips, ridges, or rough patches, start a bit more aggressively and then refine the surface.
You do not need to sand to bare wood in most cases. You do need to create a uniformly dull, smooth surface. After sanding, vacuum the dust and wipe with a tack cloth or microfiber cloth. If dust stays behind, it will show up in the final coat, especially with satin or semi-gloss finishes.
Fill, caulk, and know where to stop
A premium-looking trim job usually includes minor repairs. Fill nail holes, small dents, and surface imperfections with a quality patching compound or wood filler that sands smooth. Let it dry fully before sanding flush.
Then caulk the gaps where trim meets the wall or where two pieces of trim have slightly opened. Use a paintable caulk and apply it sparingly. Too much caulk creates a swollen edge that looks worse than the gap. And not every joint should be caulked. If a wood-to-wood seam is designed to move or show as part of the millwork detail, forcing caulk into it can look sloppy over time.
Prime when the surface calls for it
Homeowners often ask if primer is really necessary. Sometimes yes, sometimes no. If you are painting over a sound, similar-color finish and the adhesion is solid, a direct-to-surface trim enamel may work well after sanding and cleaning. But primer is the safer choice when you are covering repairs, bare wood, stains, glossy old finishes, or switching from a darker color to bright white.
Primer is also useful when you want a more even topcoat sheen. On patched areas, skipping primer can leave dull spots that flash through the finish. If the trim has knots, water marks, or old oil paint, choose a primer made to block stains and improve bonding.
Choosing the right paint for interior trim
Not all interior paint is meant for trim. For baseboards, casings, crown, and doors, look for a durable enamel or trim-specific paint that levels well and resists scuffing. This is one place where product quality pays off. Better paint tends to flow out more smoothly and cure harder, which means fewer brush marks and better long-term wear.
As for sheen, most homeowners gravitate toward satin, semi-gloss, or occasionally gloss. Satin gives a softer, more current look and can be beautiful in design-forward homes, but it is slightly less reflective and may not wipe as easily as semi-gloss. Semi-gloss remains the most common choice because it is durable, easy to clean, and visually distinct from flat or matte walls. The right answer depends on the room, the style of the home, and how much contrast you want.
Brush, roller, or spray
If you are learning how to paint interior trim, this is where technique starts to matter. A high-quality angled brush is the standard tool for most trim work, especially around detailed profiles and inside corners. For very flat, wider trim boards, a small fine-finish roller can help lay paint quickly, but it still usually needs to be tipped off lightly with a brush for the best appearance.
Spraying creates the smoothest finish in the right conditions, particularly for new trim, built-ins, and doors painted off-site or in controlled spaces. But inside an occupied home, spraying often requires much more masking and containment. For a single room refresh, careful brushing and rolling may be more practical. For extensive trim packages or high-end millwork, a spray finish may be worth the extra setup.
The best order to paint interior trim
In most rooms, paint the trim after major wall and ceiling prep but before final wall touch-up. Many professionals prefer to finish the trim first, let it cure, and then cut wall paint to the trim line for the cleanest edge. That approach can be especially helpful when trim is getting a higher-sheen finish than the walls.
Work in manageable sections. Start on less visible areas if you want a chance to settle into your rhythm. Load the brush moderately, avoid flooding corners, and follow the profile of the trim rather than pushing paint across it. Long, smooth strokes usually leave a cleaner surface than repeated short brushing.
Watch for buildup on the lower edges of baseboards and at the inside corners of casings. Those heavy spots often look fine while wet and then dry into sags. If the paint begins to tack up, leave it alone. Overworking half-dry paint is one of the fastest ways to create texture.
Two coats usually look better than one heavy coat
A thin, even first coat followed by a proper second coat almost always beats one thick coat. The first coat helps establish uniform coverage. The second gives depth, consistency, and durability. If you rush recoating before the paint has set enough, the brush can drag the first coat and create streaks or soft edges.
Dry time and cure time are different. Dry means the surface is no longer wet to the touch. Cure means the finish has hardened enough to resist blocking, dents, and sticking. On trim, that matters a lot around doors, windows, and tight contact points.
Where DIY works and where it gets tricky
Many homeowners can repaint trim successfully in a smaller room with decent existing conditions. A powder room, guest bedroom, or simple hallway may be very manageable with good prep and the right materials.
The work gets more demanding when the home has older millwork, stained trim being converted to paint, damaged casings, ornate profiles, or a large amount of trim tied into doors, built-ins, and stair parts. Those details need consistency from room to room. They also need a level of surface correction that is easy to underestimate. That is where experienced painters earn their keep. At Artist Painters, we see this often in homes where the owner wants the trim to feel intentional, not just newly white.
If you want the cleanest possible result, think of trim as finish carpentry with paint on it. Every step shows.
A well-painted trim package does not call attention to itself with gloss or thickness. It simply makes the room feel sharper, quieter, and more complete - the kind of detail you notice every day without having to think about why.